Showing posts with label diy. Show all posts

Monday, April 10, 2017

DIY Easter Themed Bento Lunches and a Bunny Breakfast


Packing lunches has always been a fun and creative outlet for me.  I've always loved surprising the kids by creating fun things for them to find inside of their lunchboxes.  Here are a few lunches that are just in time for Easter and Spring.

Simple cookie cutters automatically turn sandwiches into fun creations. 


This is one version of our diy lunchable.  The baby chick cheese and turkey were made with little stamp cutters that I found at Walmart.  They come in a set of 4 springy characters.
Have you ever heard of Wilton food markers?  They are perfect for drawing on food and making little creations like this fun Easter egg.  You can let your kids use them too to decorate their own lunches.  Our last Easter touch is adding a plastic egg with a few sweet treats inside.  I think we added fruit snacks and marshmallows.

Here we used the little stamps again, but this time it is the Easter egg.  They made cute little mini sandwiches.  A bunny egg mold also helped transform our boiled egg.


"Some bunny loves you!"  Now "The Miraculous Journey of Edward Tulane" is not an Easter book, but it happened to be our read aloud at the time.  So we did a lunch that related to the book which happened to be about a bunny and I just think bunny cheese is great.  I found those bunny pics at the Dollar tree packaged with the cupcake liners. 


Another colorful and fun decorated Easter egg with some Spring flower power here.


"You are egg-cellent."  I love to leave little messages for the kids to read.  I used to get kind of carried away when Caleb was smaller because I used to forget that he couldn't actually read.  LOL!  Someone usually helped him read it though.


And a bunny Easter breakfast is sure to put a smile on any kid's face!  Pancakes with bacon ears, string cheese whiskers and mouth, a raspberry nose, blueberry eyes and a scrambled egg tie makes this an extra special bunny friend for your littles in the mornings.


Do you enjoy packing lunches too?  Click here for more lunch packing ideas.  Oh, and don't forget Easter gifts and crafts.

I hope you enjoyed this post!

XOXO Miranda


Easter Jars Gift Idea


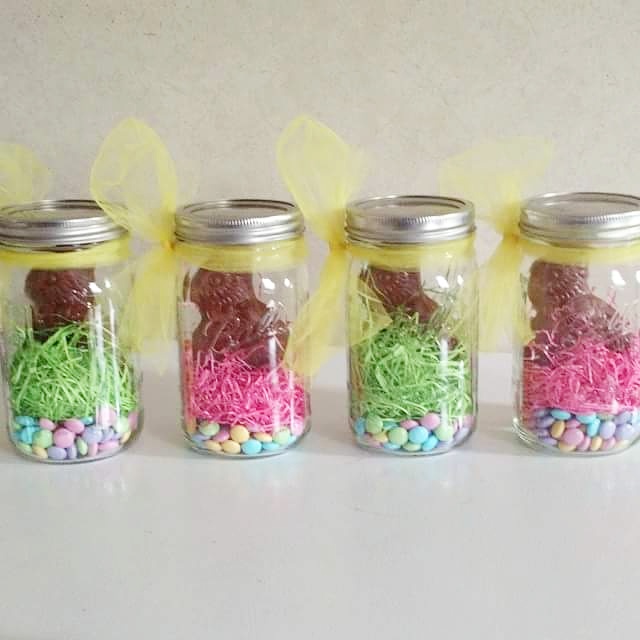
Easter is almost here!  Here is one of my favorite Easter gift ideas instead of baskets.  Easter Jars!  I don't know about y'all, but our house has been overrun by stuff.  One year, I just decided that I didn't want to do Easter baskets at all. What toys were my kids going to get in the basket that they didn't already have at home anyway...likely buried underneath something?  If your house is being overrun by tons and tons of stuff and you would just rather not deal with it all, Easter jars are a simple AND frugal idea.  They are perfect, too, for the kids that are growing out of the toys and just want treats anyway!


Aren't these just too cute?!  Not only can you make Easter jars for your kids, you can make them as gifts for others too.  We made these jars one year for the teachers.  They are filled with M&Ms, colorful Easter grass, and a chocolate bunny.  The yellow ribbon adds cute Spring touch.

 The jars can also serve as part of your holiday décor and an easy storage solution when empty.


These were the jars that I made for kids that year.  I kind of went with a bunny theme by adding bunny fruit snacks and crackers to go along with their chocolate bunnies.


We used smaller jars here being that stores were sold out of the bigger ones.  They were still just as cute with the little chubby bunnies in.


In these jars, I added some bunny peeps and a little "nest egg" to give the kids some spending money.  You can't go wrong with treats and cash, right?  These are perfect for kids who don't really play with much anyway or just like to buy things on their own.


I love how colorful the jars are!  Easter jars are still one of my favorite gifts to date.  What do you think about Easter jars?

Tuesday, September 13, 2016

Diy School Notebook


Pin It


As school starts, along with it comes a multitude of activities and events.  Keeping up with all of it can surely be a headache especially if you have more than one child.  Well, I have 5 and 3 are in 3 different schools.  So there is always paper, paper and more paper!!  To make it easier to manage, I created this school notebook.


This notebook keeps all the kids papers in order and all in one place.  It is very easy to keep up with everything that gets sent home.  (If the kids give it to you)  I just picked up a regular 3 ring binder with a sleeve in front.  I just made a very basic cover for it and bought dividers to create specific sections in my notebook.  I labeled my sections:  schedules, calendars, handbooks, and then labeled a tab for each child.  So I have 6 sections total in my notebook.


I like to use the plastic dividers with pockets so I can stick things inside them.  In the front pocket of the notebook, I have the large county handbook in the pocket.  I also have some larger packets in there as well.
You can blame baby Cason for that torn handbook. 


The first section is labeled schedules.  In this section, I put all the kids' class schedules.  If I need to bring something to the school or am going to eat lunch with someone, it's easy for me to see where they are and at what time.  Sometimes I will also write in the teacher's email beside the class for easy access to contact information.
()bviously, this isn't a real schedule.  However, you get the idea.)


The next section is calendars.  In this section, I put the school calendars,  county calendars and sports schedules and calendars.  This section helps when I'm planning out the monthly events on the family calendar.

Next is the handbook tab.  We will sometimes get a thin school handbook in addition to the larger county handbook.  I put that here.


The next tabs are tabs for each kid.  Any type of communication from their teacher/school goes into this section:  all of the newsletters, syllabi, parent connection papers, etc.


And here is why I like to use the dividers with the pockets.  Anything that really doesn't need a hole punched in it goes into the pocket.  It is also a good place to store any receipts for anything that I've purchased from the school here.


I absolutely love having this notebook because it makes it so much easier to find everything I need.  I clean it out regularly so it doesn't become a giant mess.  Organized and Neat.  It's just a few more pieces of paper that I don't have to hunt for because they are buried under a mound of them!

How do you keep your kids school papers organized? 


Wednesday, November 12, 2014

Halloween And The Making Of Queen Elsa


So I know Halloween is gone, but I'm finally finishing this post! 

Trick or treat! 
 
We didn't do much on the actual day of Halloween but we went to a few local events leading up to it and did a few things at home.


I wanted to carve pumpkins; however, we never did.  We didn't mainly because I wanted to take the kids to a pumpkin patch and let them pick out a pumpkin. This never happened, so instead we bought them each a pumpkin from Walmart to paint.
 Of course, Caleb just went ham on his, Cate was making a masterpiece, and AJ got bored easily and just said he's done. After watching them paint theirs, I wish I would have bought me one to paint. They are currently on display in the hall.


"Let it go!" "Let it go!" Everyone in the world has probably heard this song and been forced against their will to watch the movie countless times. I know we have and I looooved the movie. However, instead of learning the lyrics like the husband and being able to actually sing it, I was busy writing spoofs to the song. You know, because I think I'm largely hysterical and besides God blessed me with sarcasm and a pen. I couldn't just let that go to waste.

Okay, so for halloween I knew Cate was going to want to be Queen Elsa.


Caleb was Spiderman and you mustn't ever call him Caleb while he's in costume or he might unleash his spidey powers on you. He was also certain that I wasn't fixing his mask right. It kept digging in his eyes so we finally got annoyed with it and took it off.  He was also very certain that Spiderman doesn't use a car seat. Tough luck kid.  Tough luck.   Aj, who initially wasn't going to dress up (He's too cool now.), decided to be the Scream thing again this year.  I heard some older men questioning him about Scream.  I think they were trying to see if he had seen it.  He hasn't. 


Dear Lord, thank you for my sarcastic and sometimes sick sense of humor. We have so much fun. Lol.  I kept nudging him to just glare out the window at people and even stare the cop down next to us at the red light. I really wanted to put him in the trunk when we got home to scare his daddy but he was sleepy by the time we arrived.  Doggit!


So onwards, shall we.  Everybody in the house knew Cate would want to be Queen Elsa, like almost every little girl in the county.  When we first looked at the Queen Elsa costume in the store, I didn't like it that much. It was pretty, but I just didn't like it that much. This is what's wrong with creative people. We always think we can do something. So we headed right over to the fabric department of Walmart and checked out some fabric.


Initially, this is what I came up with. Now keep in mind, that I have basic basic sewing knowledge and I operate on a "I'll figure it out" mentality. I had this idea in my head, but I just didn't know how it was going to actually manifest into a dress.


So I only had two days to pull this together because there was this school Halloween dance.  However, the whole first day I literally just sat on the sofa looking at that fabric on the floor...thinking.  On day 2, I really didn't have a choice but to get on the ball and I knew there was a good chance that I wasn't going to finish. 


I honestly had very little clue how I was going to pull it off. I found a cape tutorial online that looked simple. I didn't have butcher paper so I had to tape printer paper together! I do think I picked just the write fabric for the cape. What do you think?


The actual dress is what almost sent me to hell. When that bobbin start getting tangled up and acting foolish....Except for one side of this skirt, the entire dress was sewn by hand. If I had started earlier, it wouldn't have been so bad. However, I was under pressure.  So here are my very basic basics.


For the sleeves, I literally wrapped the fabric around her arms, pinned, cut and sew. Tada! The shimmery part initially was hard to figure out. I folded a piece of fabric less than half and I used a bowl to trace halfway for the head hole. I believe I sew the arms on next. Initially, the bodice was going to be the same light blue color but then all the pics I looked at on the internet there was a darker bodice. So I went back to Walmart and bought a darker shade of fabric to go with it.  Then, just like you'd drape a sheet around you and play princess, that's exactly how I made this piece and cut. I then didn't know how the child was supposed to get in and out of the dress. Would she been Queen Elsa forever? So of the clearish and bodice part, I just cut straight up the middle of her back. This probably isn't making much sense.  Next, I sew the clearish piece to blue bodice and sew that to the skirt. Follow? I'm sure you didn't. If you sew, regularly, you're probably wondering what the world did she do? Lol.


Here's what happened next. Sort of.  I took a knee length skirt she had and laid it on top of the butcher paper and just finished drawing it out like a cone for back. I measured her from waist down and did same thing for front, this time drawing out like a triangle.


After I finished, I just had to stand back and watch my creation like I was on Project Runway.  I was completely baffled by the fact that I had actually made the thing and it was recognized as the Queen Elsa costume.  Now had I knew what I was doing, this probably could have been a bit better. I actually tied the cape around her neck because someone stepped on it at school and tore the Velcro off and I forgot to sew it on this time.  I didn't sew it on the first time because I ran out of time and was hoping it would stay put. 


Getting snow cones at the frat houses at GSU.


Buy you know what, this costume got me the title of "Best Mom Ever!"  Whoop! Whoop!  However after she said that, she corrected herself and said well actually you're my only mom ever.  I'm going with the first one.  It also won 2nd place in the school costume contest! Alright Project Runway, I think I'm ready! 


Hope all the kiddos had a great Halloween.

Tuesday, January 14, 2014

Homemade Lip Balm

Now I have been obsessed with the idea of making my own natural products for a while now.  My little pinterest board has been growing will several home made concoctions. 

Now, I love lip balm. I'm not a huge lipstick wearer but I always have some type of moisturizing lip balm on me. I mean, there is nothing worse than chapped peeling lips, especially in the winter.
This was supposed to be a Christmas gift, but the containers that I wanted to order would not be back before Christmas.  I also couldn't find any other containers anywhere.   So I did make this sample one for myself.   It's easy and really doesn't take that long at all.


This recipe makes a softer oiler lip balm.
 
Here's what you'll need:
 
4 tsp. coconut oil
3 tsp. sweet almond oil
2 tsp. grated beeswax
a few drops of essential oil (optional - I used Lavender)

Grated beeswax


 Put everything into a small bowl and melt. If you don't have a double boiler, like me, sit the bowl in a pot of boiling water to melt. This is what it looks like when it's all melted.


I found a small plastic container to pour it into to cool.  You'll have to find something to do or eat while you wait for it to set.  This is what it looks like after an hour.  Because I made this late at night, I just let it sit for a few hours.  3 total.


Of course, I stuck my finger in to test it.  Just ruined it. lol


The longer you let it sit, the more it sets. I left it over night just to see.


Without lip balm


With lip balm.
When you put it on, it is like an oil. It looks like a light lip gloss. I use it throughout the day and will definitely be making more. I think I'm going to play around with the ingredients too, just to see what I can come up with.

Thursday, December 19, 2013

Homemade Christmas - Playdough


Well, I haven't been doing much blogging lately, have I?  It has been such a busy hectic time as I mentioned earlier this week.  Despite the month of December slowly turning into a monster, I've been trying to maintain some sort of merry in our Merry Christmas. 

We've had some minor stuff going on like the printer crashing, the laptop monitor busted and Caleb and I having the stomach virus.  This wasn't much to deal with, but then the big stuff happened.  My father n law was airlifted to the hospital and was in ICU, my mother n law had to have a blockage removed in her heart and Caleb ran into the coffee table and got a huge nasty bruise by his eye.  As of today, most everything has or is being resolved.  My husbands parents are both doing much much better and Caleb is doing a lot better, too.  Thank the Lord. 

But on to the Play dough.

I'm finally getting another post up of some of my homemade gifts.  Play dough.  It's one of Caleb's favorite things and I knew this would make a great gift for him.  I'm no longer making the rainbow crayons.  I suppose I must have accidentally thrown all the broken pieces away because I don't know where they got to. 


Ingredients:
 
1 cup flour
1 cup water
1/4 cup salt
2 tsp cream of tarter
1 tsp vegetable oil
food coloring


Dump all the ingredients in a pot except the food coloring and mix together. 


Cook over medium heat.  It will start to thicken.


Keep stirring the dough until it forms a ball.  When it is no longer sticky, it's done. 


It's done.  This is one of three balls that I divided the dough into.


I poked my fingers in the middle and added some food coloring.


Next, knead and mix the food coloring in the dough.


Green play dough!


I used an old peanut butter jar that was cleaned out to store the play dough.  I added some cookie cutters to make a finished gift.
 
I know Caleb is going to love it.  He is always eyeing the play dough in the toy aisles in the store and it's been a good while since we've had some in the house.  Now, finding this smashed into the carpet, I'm probably not going to like that too much. lol